

Microsoft Teams offers a range of useful functionality for achieving different needs in an organization. My bet is that all the basic needs for effective collaboration and communication has been achieved by Teams as it is out of the wrap and this explains it's wide-spread adoption among different organizations of different sizes. Some of the cool things that Teams is capable of are that teams can chat, meet, share files, and integrate various apps and services.
Well since basic sometimes gets boring and being beings we are meant for more then this article will give you an insight on how you can customize and extend the functionality of your now "boring" Teams app to super-charge it to the wildest hero to handle all your needs.

I guess you are ready so let me introduce you to Teams Tabs and Bots. Tabs and Bots offer valuable features that enhance collaboration and improve overall productivity within the Teams environment.
Starting with Tabs, here are a few reasons why you would need them:
- Centralized information access - Tabs allow integrating external apps and services into Teams thereby providing a centralized hub for accessing information.
- Custom workspaces - Create custom tabs to tailor Teams to your own liking.
- Visual representation - Tabs offer a visual representation of information, making it easy to share and collaborate on content like documents, dashboards, or project boards.
And here are the reasons you might need bots:
- Automated assistance - This is by answering frequently asked questions, retrieving information, and performing routine tasks, saving time for users
- Task automation - Bots can automate repetitive tasks, allowing team members to focus on more strategic and creative aspects of their work.
- Real-time notification - Bots can send real-time notifications and updates, ensuring that important information reaches team members promptly.

Am hoping before we begin developing Tabs or Bots you get the basics on why you would need them. Incase you missed something follow https://learn.microsoft.com/en-us/microsoftteams/platform/ and under capabilities both Tabs and Bots links for more information are displayed incase you want a deeper understanding of both.
Now lets take a ride to the muddy side. Building a Tab is not as hard as you might think. What you will need to have are just Vs code and a Microsoft Teams account.
Now head over to Vs code and in the extensions tab install Teams Toolkit extension. Once you have that extension installed, your Vs code will be looking as the one below:
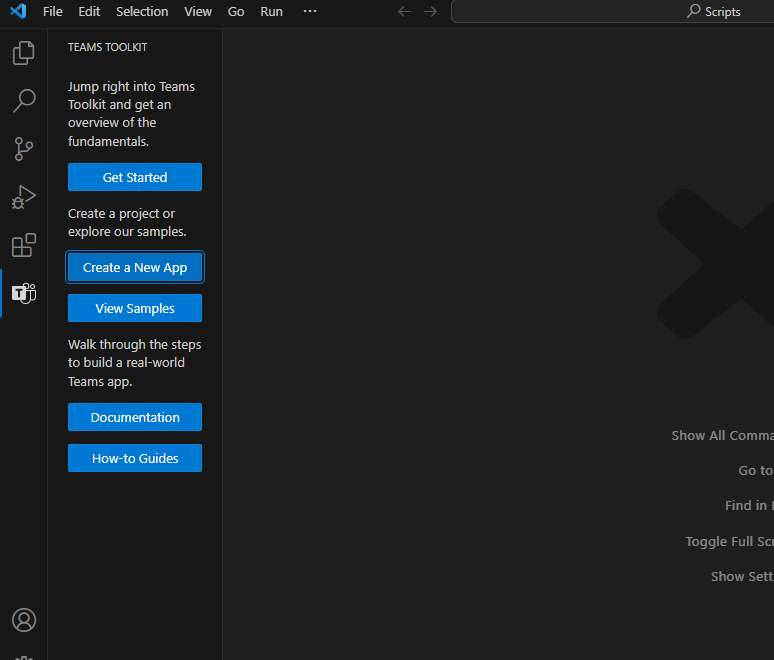
On the left panel, a tab with a T-icon appears and on clicking it it open another bigger tab with different options of which one of them is Create a New App (See in the image above). Click the button to Create a New App and you are presented with a few options of the type of app you want to create. One of the options is Tab(See image below).
 After choosing to develop a Tab, you will be asked to select the capability of the Tab we are building. Since it is a minimal tab for learning we select a Basic Tab(See in image below).

In the next step we select the language we want to develop our Tab with. In this tutorial we will use JavaScript as our language to build the tab. After selecting the language, the next step requires us to provide the location where we want to store our project files. Provide a location based on your preferred work location. After this we are asked to provide the name of the Tab we are building. For this tutorial I will name it BasicTabTest.
After providing the name and clicking the enter button, the project folder will begin being generated. This will be shown in the bottom right corner by a pop-up as show below.

After the template is downloaded, a new pop-up of the Vs code with the generated code for the tab is displayed. The first page we meet is the overview. This page contains the prerequisites to run the app, what is included in the app that is the folders and some urls to extend the functionality of the app.
When we start debugging(Run) this basic skeleton provided by the Teams Toolkit extension, after all the checks are perfomed and the Tab is good to go it opens one Microsoft edge browser and asks you to login to your Teams account. After login, a pop-up asking you to add our tab will be launched and when you click add, the tab will be added to your Microsoft Teams app. You can check it among the other tabs on the left panel.

As you can see the tab is added into our teams. On opening it we have a simple "Hello, world!" program.
Now looking at the folder structure, we have the src folder which we will give a brief overview. In the src we have the app.js, this is where code to start our server and provide the different routes to different pages is. In the same src folder we have both static and views folder. In the views is where we code our different pages of the tab and at the moment it is only hell.html present. In the static folder we have the scripts that will interact with our pages and the style folder which stores the styling used in our pages in the view. And that is the overview on tabs.

Now that you already have the basics of how to get started, go out and super-charge that teams app for your organization or business. And as always: Crack that code!


