In today's interconnected world, integrating email functionality into your applications can significantly enhance user experience. Microsoft Outlook is widely used in enterprise environments, and accessing its data can be valuable for many business applications. In this blog post, I'll walk you through how to read emails from Microsoft Outlook using NestJS and the Microsoft Graph API, with detailed explanations of each step.
Prerequisites
Before we dive in, make sure you have:
1. A Microsoft Azure account with admin access
2. A registered application in Azure Active Directory
3. NestJS application set up
4. Basic understanding of OAuth 2.0 authentication
Setting Up Azure Active Directory
First, you need to register your application in Azure AD to establish a trust relationship between your application and Microsoft's identity platform. Here's a detailed breakdown of the process:
1. Navigate to the Azure Portal: Log in to your Azure account and find the Azure Active Directory service.
2. Create App Registration:
- Click on "App registrations" in the left sidebar
- Select "New registration" to create a new application
- Provide a descriptive name for your application that your users will recognize
3. Configure Redirect URIs:
- Set the redirect URI where Azure AD will send authentication responses
- This should match the callback endpoint in your NestJS application (in our example, it would be something like `https://yourapp.com/azure/redirect`)
- Select the appropriate application type (web application)
4. Set API Permissions:
- Go to "API permissions" in your app registration
- Add these Microsoft Graph permissions:
- Mail.Read (to read user emails)
- Mail.ReadBasic.Shared (for shared mailbox access if needed)
- User.Read (for user profile information)
- MailboxFolder.Read and MailboxItem.Read (for folder access)
- offline_access (for refresh tokens)
- Don't forget to grant admin consent if you're managing an organizational app
5. Create Client Secret:
- Go to "Certificates & secrets" section
- Create a new client secret
- Copy and save this secret immediately as you won't be able to view it again
6. Note Important Configuration Values:
- Client ID (Application ID)
- Tenant ID (Directory ID)
- Client Secret (from the previous step)
These values will be essential for your application's configuration.
Project Structure
For this integration, we'll need several key components:
1. Environment Configuration: Store Azure AD credentials securely in environment variables
2. Graph Service: Handle communication with Microsoft Graph API
3. Azure AD Controller: Manage authentication flows and token handling
4. User Service: Store and manage user tokens in your database
5. Helper Service: Utility functions for user management
Let's explore each component in detail.
Setting Up Environment Variables
Create a constants file or use NestJS's ConfigModule to securely store these sensitive values:
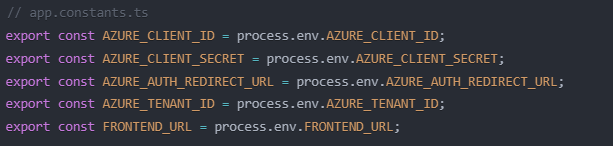
Never hardcode these values in your application code!
Implementing the Graph Service
The Graph Service is responsible for communicating with Microsoft Graph API. Here are the key methods you'll need:
Token Validation
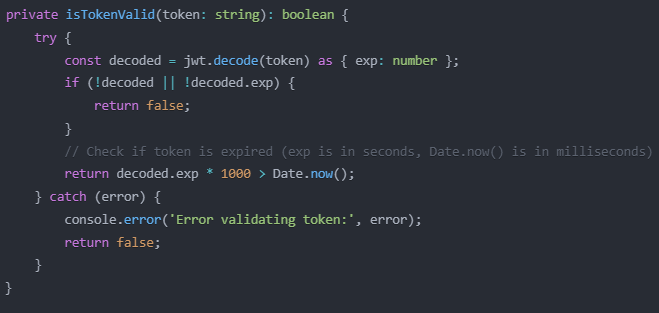
This method decodes the JWT token and checks if it's expired by comparing the expiration timestamp with the current time.
Access Token Retrieval
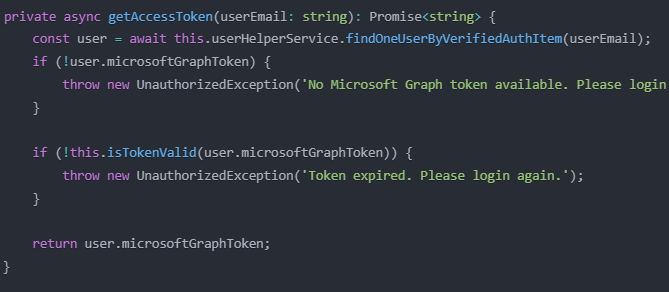
This method retrieves the user's token from the database and validates it before use.
Email Retrieval
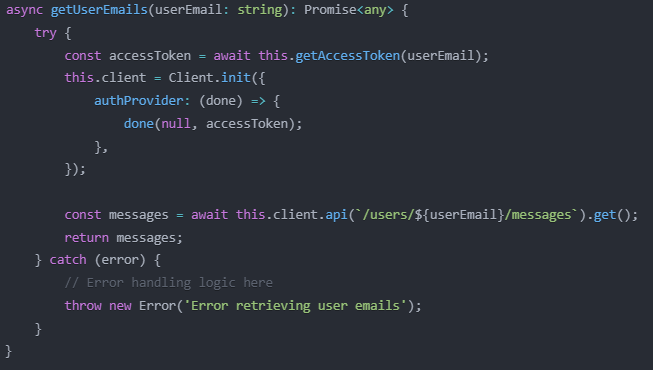
This method initializes the Microsoft Graph client with the user's access token and makes an API call to retrieve their emails.
Implementing Authentication with Azure AD
The Azure AD Controller manages the OAuth flow with Microsoft. Here are the key endpoints you'll need:
Login Endpoint
@Get() goToAzureADLogin(@Res() res: Response) { const authUrl = `https://login.microsoftonline.com/common/oauth2/v2.0/authorize?client_i…${AZURE_CLIENT_ID}&response_type=id_token+code&redirect_uri=${AZURE_AUTH_REDIRECT_URL}&scope=openid profile User.Read Mail.Read email offline_access&response_mode=form_post&nonce=678910`; return res.redirect(authUrl); }
This endpoint redirects the user to the Microsoft login page with the appropriate parameters.
On-Behalf-Of Token Exchange
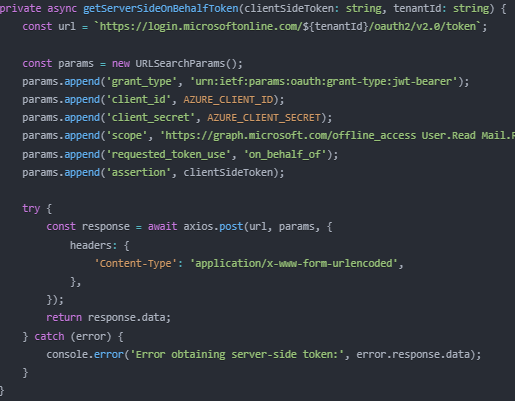
This method exchanges the client-side token for a server-side token using the On-Behalf-Of flow.
Callback Handler
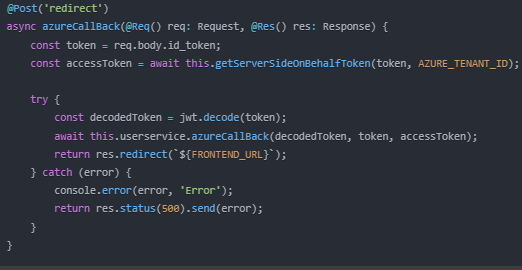
This endpoint processes the callback from Azure AD, exchanges tokens, and stores them in your database.
Email Access Endpoint

This simple endpoint uses the Graph Service to fetch emails for a specific user.
The Authentication Flow in Detail
Let's break down the entire authentication process:
1. User Initiation:
- User clicks a "Login with Microsoft" button in your app
- Your app redirects to the `/azure` endpoint
2. Azure AD Authentication:
- User is redirected to Microsoft's login page
- They enter their credentials and consent to the requested permissions
- Microsoft validates the credentials and sends the user back to your callback URL
3. Token Exchange:
- Your app receives an ID token containing basic user information
- Your server exchanges this token for an access token using the On-Behalf-Of flow
- This step is critical as it allows your server to make API calls on behalf of the user
4. Token Storage:
- Your app stores the tokens (access token, refresh token) in your database
- These are associated with the user's account
5. API Access:
- When the user wants to access their emails, your app uses the stored token
- The Graph Service validates the token before making API calls
- If the token is expired, your app uses the refresh token to get a new one
This flow follows OAuth 2.0 best practices and ensures secure access to user data.
Reading Emails with Graph API
Once authentication is set up, reading emails becomes straightforward. Here are some example API calls:
Basic Email Retrieval
const messages = await this.client.api(`/users/${userEmail}/messages`).get();
This simple call returns a list of email messages in the user's inbox.
Filtering Emails
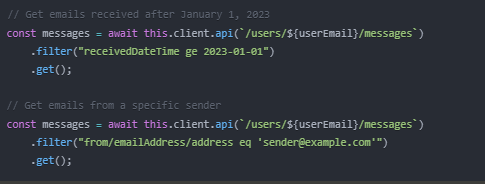
These queries use OData filter syntax to retrieve specific emails.
Reading Email Content

This call retrieves detailed information about a specific email.
Working with Attachments
// Get email attachments
const attachments = await this.client.api(`/users/${userEmail}/messages/${messageId}/attachments`)
.get();
This call retrieves attachments for a specific email.
Advanced Features
Once you have the basic email reading functionality working, you can extend it with more advanced features:
Reading Specific Folders
// Get emails from Sent Items folder
const sentItems = await this.client.api(`/users/${userEmail}/mailFolders/SentItems/messages`).get();
// List all available folders
const folders = await this.client.api(`/users/${userEmail}/mailFolders`).get();
These calls let you access specific email folders and discover available folders.
Pagination
// Handle pagination for large mailboxes
let messages = await this.client.api(`/users/${userEmail}/messages`).top(50).get();
let nextLink = messages["@odata.nextLink"];
while (nextLink) {
const nextPageMessages = await this.client.api(nextLink).get();
messages.value = [...messages.value, ...nextPageMessages.value];
nextLink = nextPageMessages["@odata.nextLink"];
}
This code handles pagination for users with many emails.
Security Considerations
When implementing Microsoft Graph integration, consider these security best practices:
1. Token Storage:
- Store tokens in your server database, preferably encrypted
- Associate tokens with specific user accounts
2. Token Validation:
- Always validate tokens before use
- Include proper error handling for expired tokens
3. Least Privilege:
- Request only the permissions your application actually needs
4. Refresh Token Management:
- Implement proper token refresh logic:

5. Error Handling:
- Provide clear user feedback for authentication failures

Proper security implementation protects both your application and your users' data.
Conclusion
Integrating Microsoft Outlook emails into your NestJS application opens up numerous possibilities for enhancing your application's functionality. By following the steps outlined in this guide, you can create a secure, efficient integration that provides value to your users.
Remember to:
- Set up proper Azure AD application registration
- Implement the complete OAuth authentication flow
- Create a well-structured Graph Service for API interactions
- Handle tokens securely throughout your application
- Build upon the basic functionality with advanced features
With these components in place, you'll have a robust foundation for working with Microsoft's email services.
The Microsoft Graph API offers many more endpoints for working with calendars, contacts, and other Microsoft 365 services. As you become more comfortable with the basics, explore these additional features to create even more powerful integrations.
Happy coding!